

Landscape painter John Hughes shares a step-by-step painting demo, illustrating his problem solving process for an acrylic study.
Making Small Acrylic Studies As a Way to Prepare for Studio Work
BY JOHN HUGHES
There’s really no such thing as too much preparation when it comes to planning large studio paintings. Artists often get antsy to get into the paint right away, thinking that they will just work out the problems as they go along. While this approach is good for spontaneity, who wouldn’t benefit from a little extra planning? Spontaneity, after all, is not restricted in any way by some forward thinking and preliminary study.
One of the main advantages of initial planning is that it can give an artist a real sense of what will work on a larger format, and what will most likely fall short. Of course I’m referring to the practice of working up some sort of comps, or small studies, in order to explore ideas in an easily manageable format.
The simplest form of a comp is a thumbnail sketch, which doesn’t have to be any larger than an inch or two in height or width. These little gems are not meant to be rendered with any detail, just simple flat shapes put down quickly in a sketchpad, as pure designs in pencil.
If impressed with this initial arrangement, the artist can then either go right into a painting, as in a plein air study, or they can further explore ideas in the studio, with full blown graphite, or charcoal drawings.
The Advantage of Painting with Acrylics
For my studio work, I will sometimes start out with a thumbnail sketch and then progress directly to a small acrylic, without any further drawing. The reason I like working in acrylics for this purpose, is because this medium, along with several other water based mediums, has the advantage of not being time sensitive. In other words, I can start one of these and work for as long or as little as I want. If I get called away from the studio for any length of time, especially a day or two, I can pick up right where I left off. With oils there is a certain period while it’s wet, that you can keep on working, but once it starts to get really tacky you should wait until it’s fully dry before working back into it again.
Another reason for using acrylics is that corrections are so easy; just paint over the offending passages and you’re on your way to building up layer after layer with no wait time. This makes acrylics a no-brainer for me, when working up ideas. Additionally, I can see these ideas in color and value, which helps me make better decisions about the possibility of painting larger studio oils.
When finished, these little studies can either be kept in the studio, to help inform me when painting similar subjects, or they can be framed and dropped off to the gallery; that’s always a win.
I should mention one other very large advantage in working up studio comps; they go a long way to helping any artist improve their design skills, and that is huge. The ability to design well is the one thing which separates mediocre work from well-crafted paintings, and it’s hard to argue with that. As stated before, making changes to the design is relatively easy on a small acrylic comp, whereas doing the same on a larger studio piece takes a lot more guts. This is because experimenting on large works, especially when nearing the finish line, also risks destroying something that you have poured many hours into developing.
In summary, preliminary work is a winning approach, which really has no downside. Below I have illustrated my thinking during a problem solving session on a 6 x 8 acrylic. The idea behind this small comp will most likely be the subject of a larger studio piece in the future. Please enjoy, and feel free to make comments below this article.
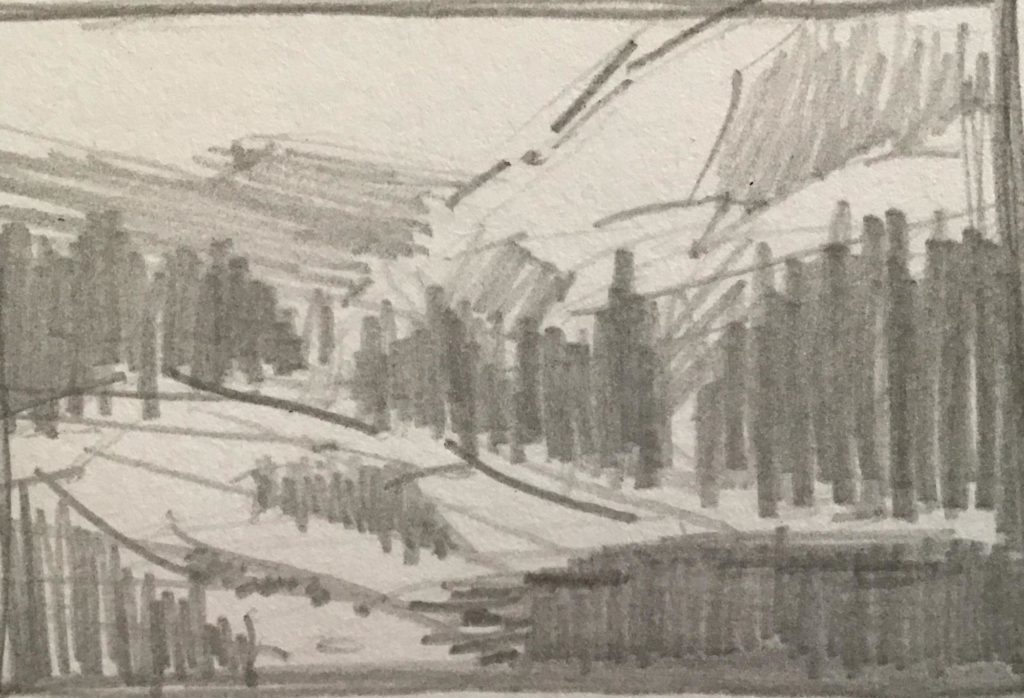
The process begins with a small thumbnail sketch which is executed in a matter of seconds. It serves the purpose of organizing my thoughts on the arrangement of the basic design. Satisfied with this idea, I move on to the 6 x 8 panel.
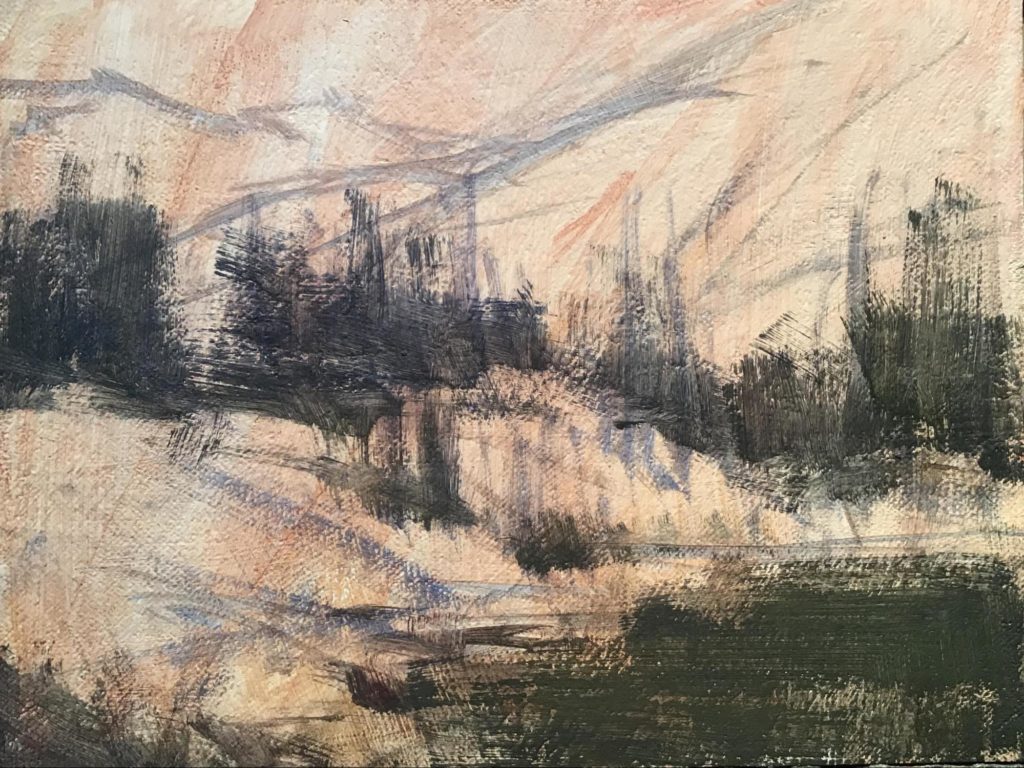
The drawing starts out with a warm wash of Cad Red Medium and a touch of Burnt Sienna. I lay in some very sketchy lines and then progress to a larger brush, which is used to indicate the value mass of the pines and their dark reflections in the water. These shapes combine to create one big “super-shape.” With this in place, I can now assess how the overall abstract pattern will work in the underlying design.
I don’t want to introduce any detail at this stage, only this abstraction, to see how it feels in relation to the rectangular panel. At this point it feels balanced, so I am ready to move on.
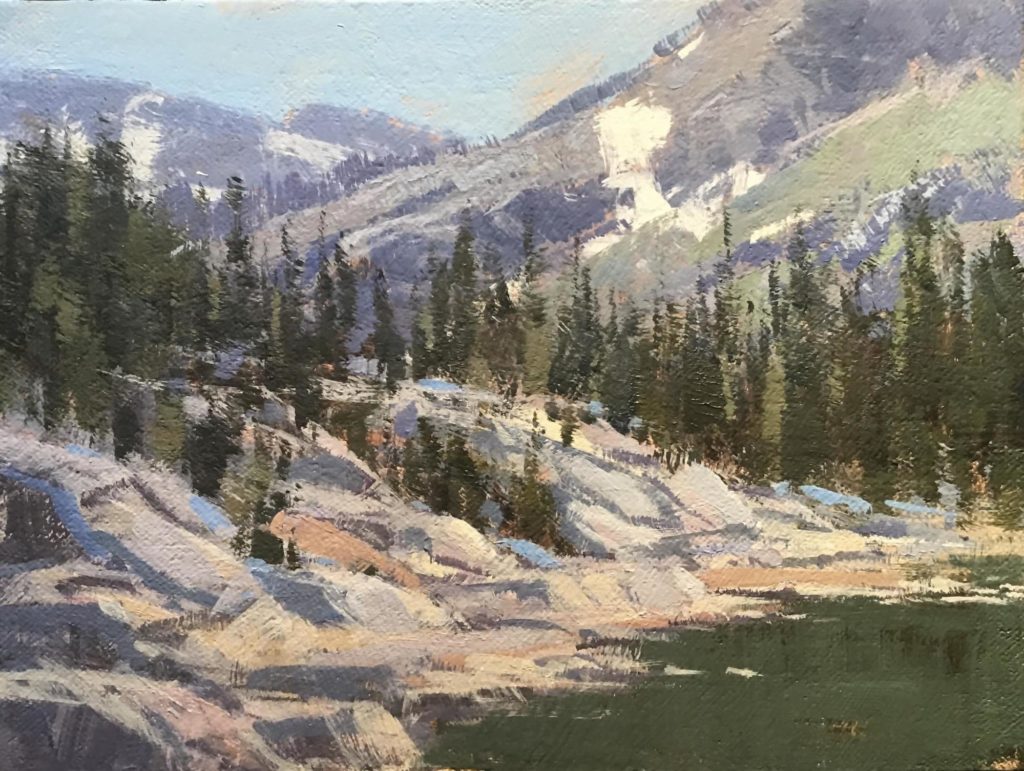
In this stage, I mass in the major mid-tone shapes, while indicating where the main shadows on the mountain and foreground rocks will go. As you can see, I’m not concerned with covering up every square inch of the initial wash. As the painting progresses, this wash will continue to get more and more coverage, but if it happens to show through in a few places, it will act as a unifying tone which can only help the overall feel of the painting.
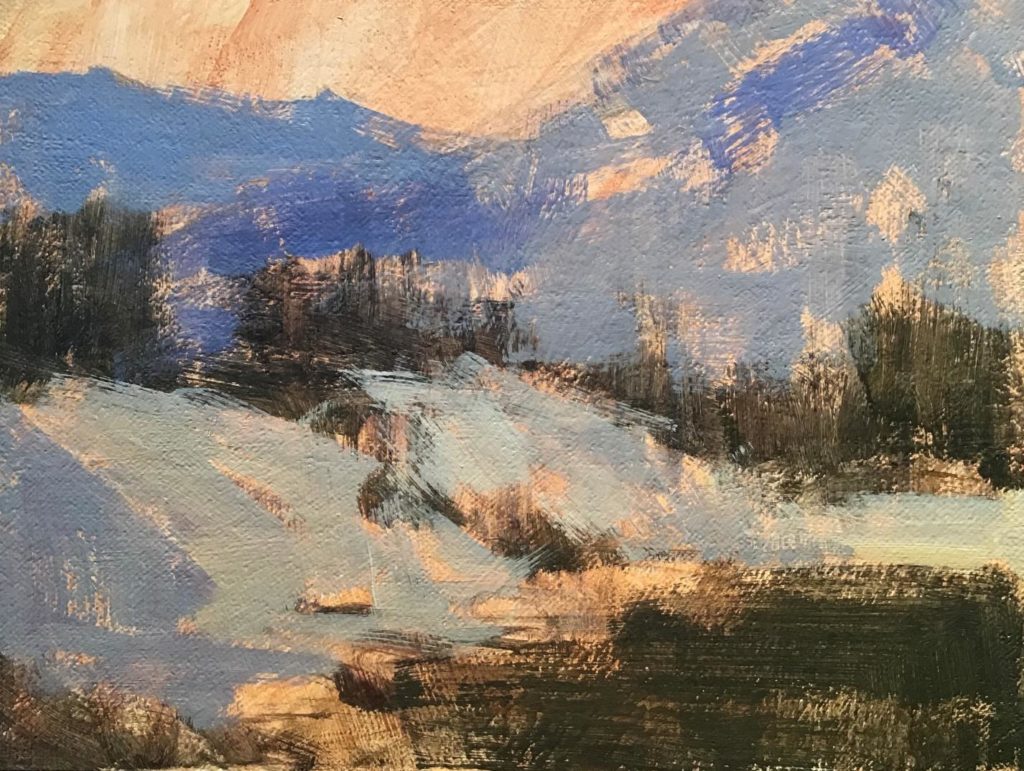
In this step, I wanted to get all of the major color and value relationships in place, in order to judge their accuracy in relation to each other. The image starts to take on a pleasing effect, but I now see two major design problems, which I will have to deal with at some point in the painting process. The first problem is the abrupt directionality of the foreground and background land masses, which link up and form a secondary super-shape because of the distracting parallel of the shoreline.
The second problem is what I call the “clash of the triangles.” Can you see them in the shape of the mountain on the right where it meets the triangle of the foreground rocks? Something will need to be done, but I put off making a decision for a while, as I continue to model the major forms of the rocks, trees and mountains.
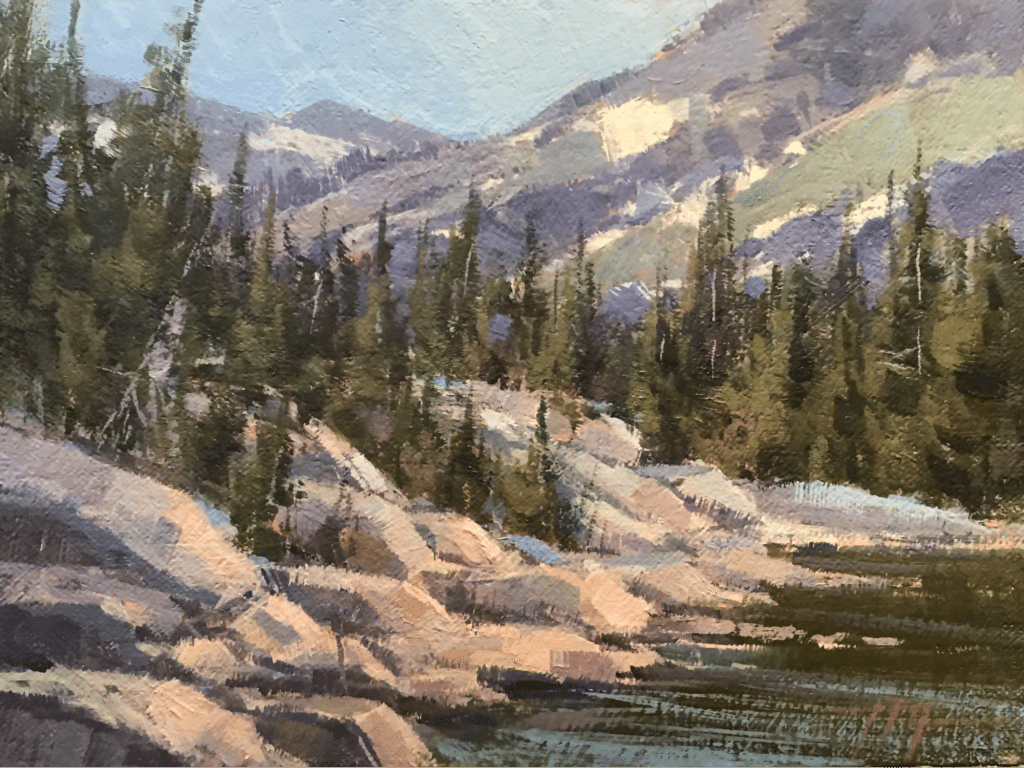
As I introduce modeling into the foreground rocks, the directionality of the crevices stand in stark opposition to the long parallel relationship of the mountain and shoreline. This happy development begins to relieve my first design problem. The added detail helps to shift my attention from the once obvious error, which is still there in the underlying design, but is less noticeable now.
More work will need to be done to fix the problem, but it’s an excellent start. This just goes to point out, that nothing in a painting exists in isolation. For better or for worse, every mark on the canvas has an effect on the whole design, and that’s why we are known as artists, and not reproduction specialists!
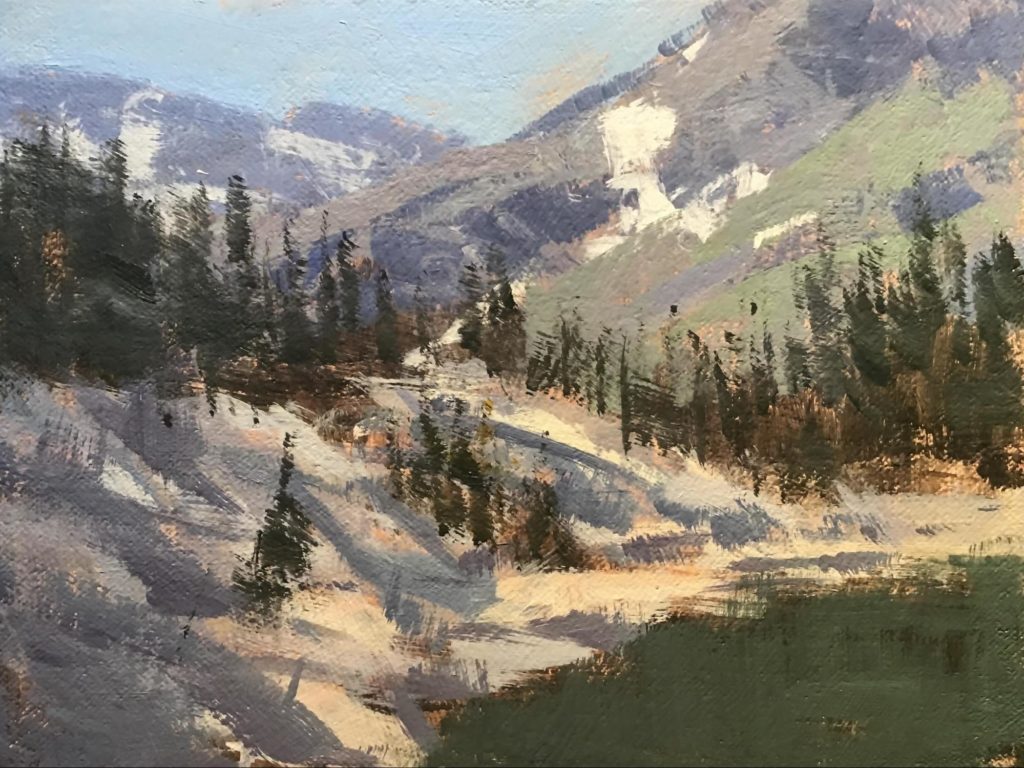
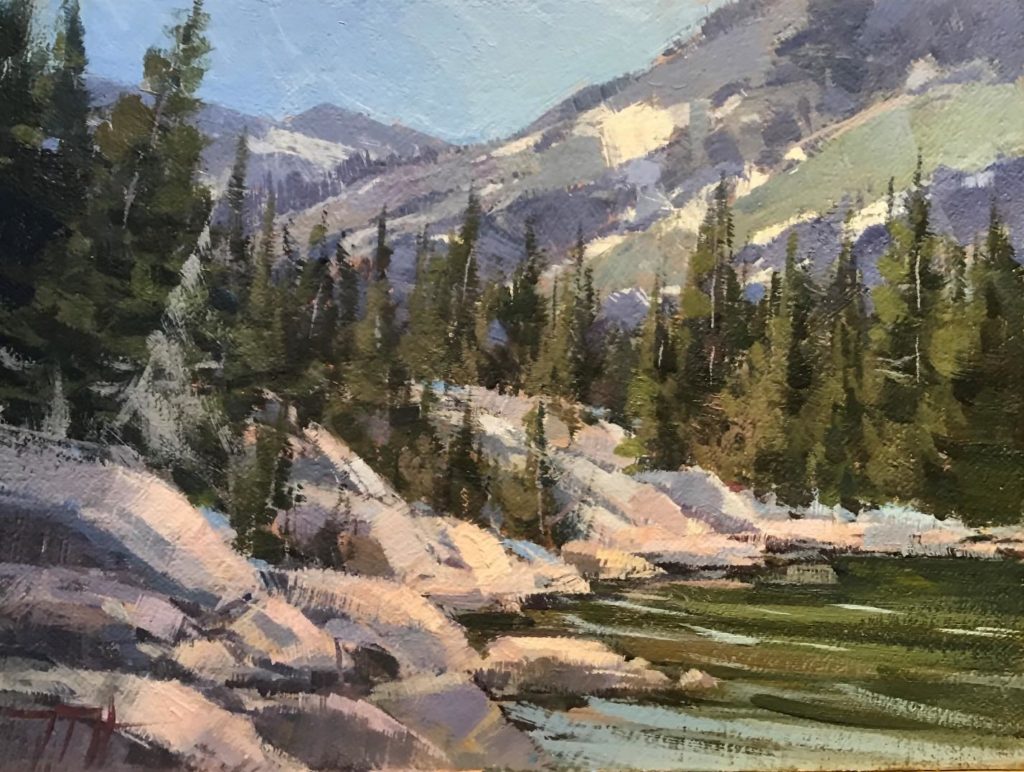
In this stage, I decided to raise the pines above the foreground rocks, in order to create more interest and depth, which also adds a strong counter movement to the parallel problem I’ve been working on. I also feel like the diagonal direction of the sky reflection in the water, effectively adds another counterpoint; but after giving myself time to ponder on the almost finished study, I try one more thing to bring the painting into balance. If that weren’t enough, I see another little design distraction in the foreground rocks.
Do you see the three, fairly equal triangles formed by their shadows? Luckily, the addition of my initials in the last step seems to relieve this distraction, and I’m almost exhausted from analyzing.
> Click here to subscribe to the free newsletter, Plein Air Today
> And click here to subscribe to PleinAir Magazine so you never miss an issue!


This was great reading. Thank you for this demo. It is interesting to read your thoughts on developing a painting.
Thank you Val, I’m glad you got something out of it and I appreciate the feedback!
I loved this as a new new artist I am not sure I have the skills but im trying. Im self taught but the steps you laid out were easily understood and executed. I am a single mother of three So I don’t have money but I really want to learn more any advice or links I can visit?
Hi, Erika! Yes, we have plenty of workshops that are available for purchase, but I’m also happy to share the following links that you can bookmark and refer to at any time! 🙂
Articles about acrylic: https://www.outdoorpainter.com/?s=acrylic
Art School Live with Eric Rhoads: https://www.youtube.com/user/streamlineartvideo (all media)
Happy painting!