

Understanding your materials can take you a long way toward avoiding many of the problems that plague plein air pastel artists. Here, four seasoned pros share their best advice for sidestepping sticky situations by learning when to use which sticks in your toolkit, how to prevent the wind from sending your paper or pastels flying, and what to do when an unexpected rainfall threatens to ruin your painting.
Editor’s Note: Join us for Pastel Live, September 17-19, 2025, with an Essential Techniques Day on September 16! (No tech skills? No problem! If you can click a link, you can join our event!)
Problem 1: Your materials and easel keep toppling in the wind.
Solutions: “A sudden gust of wind can take down your whole setup, leaving all your favorite pastels in pieces on the ground,” says Florida artist Shawn Dell Joyce. “Since I teach plein air painting classes on the beach, and compete in areas with unpredictable weather, I’ve learned to take a few precautions against sudden storms.
“To start, I don’t put all my sticks in one box attached to my easel. Instead, I keep my pastels in a toolbox that can be secured easily and expands when open to show the entire range of contents. This box can be positioned lower than an easel box and sits on top of a carrier that is heavy enough to withstand wind.
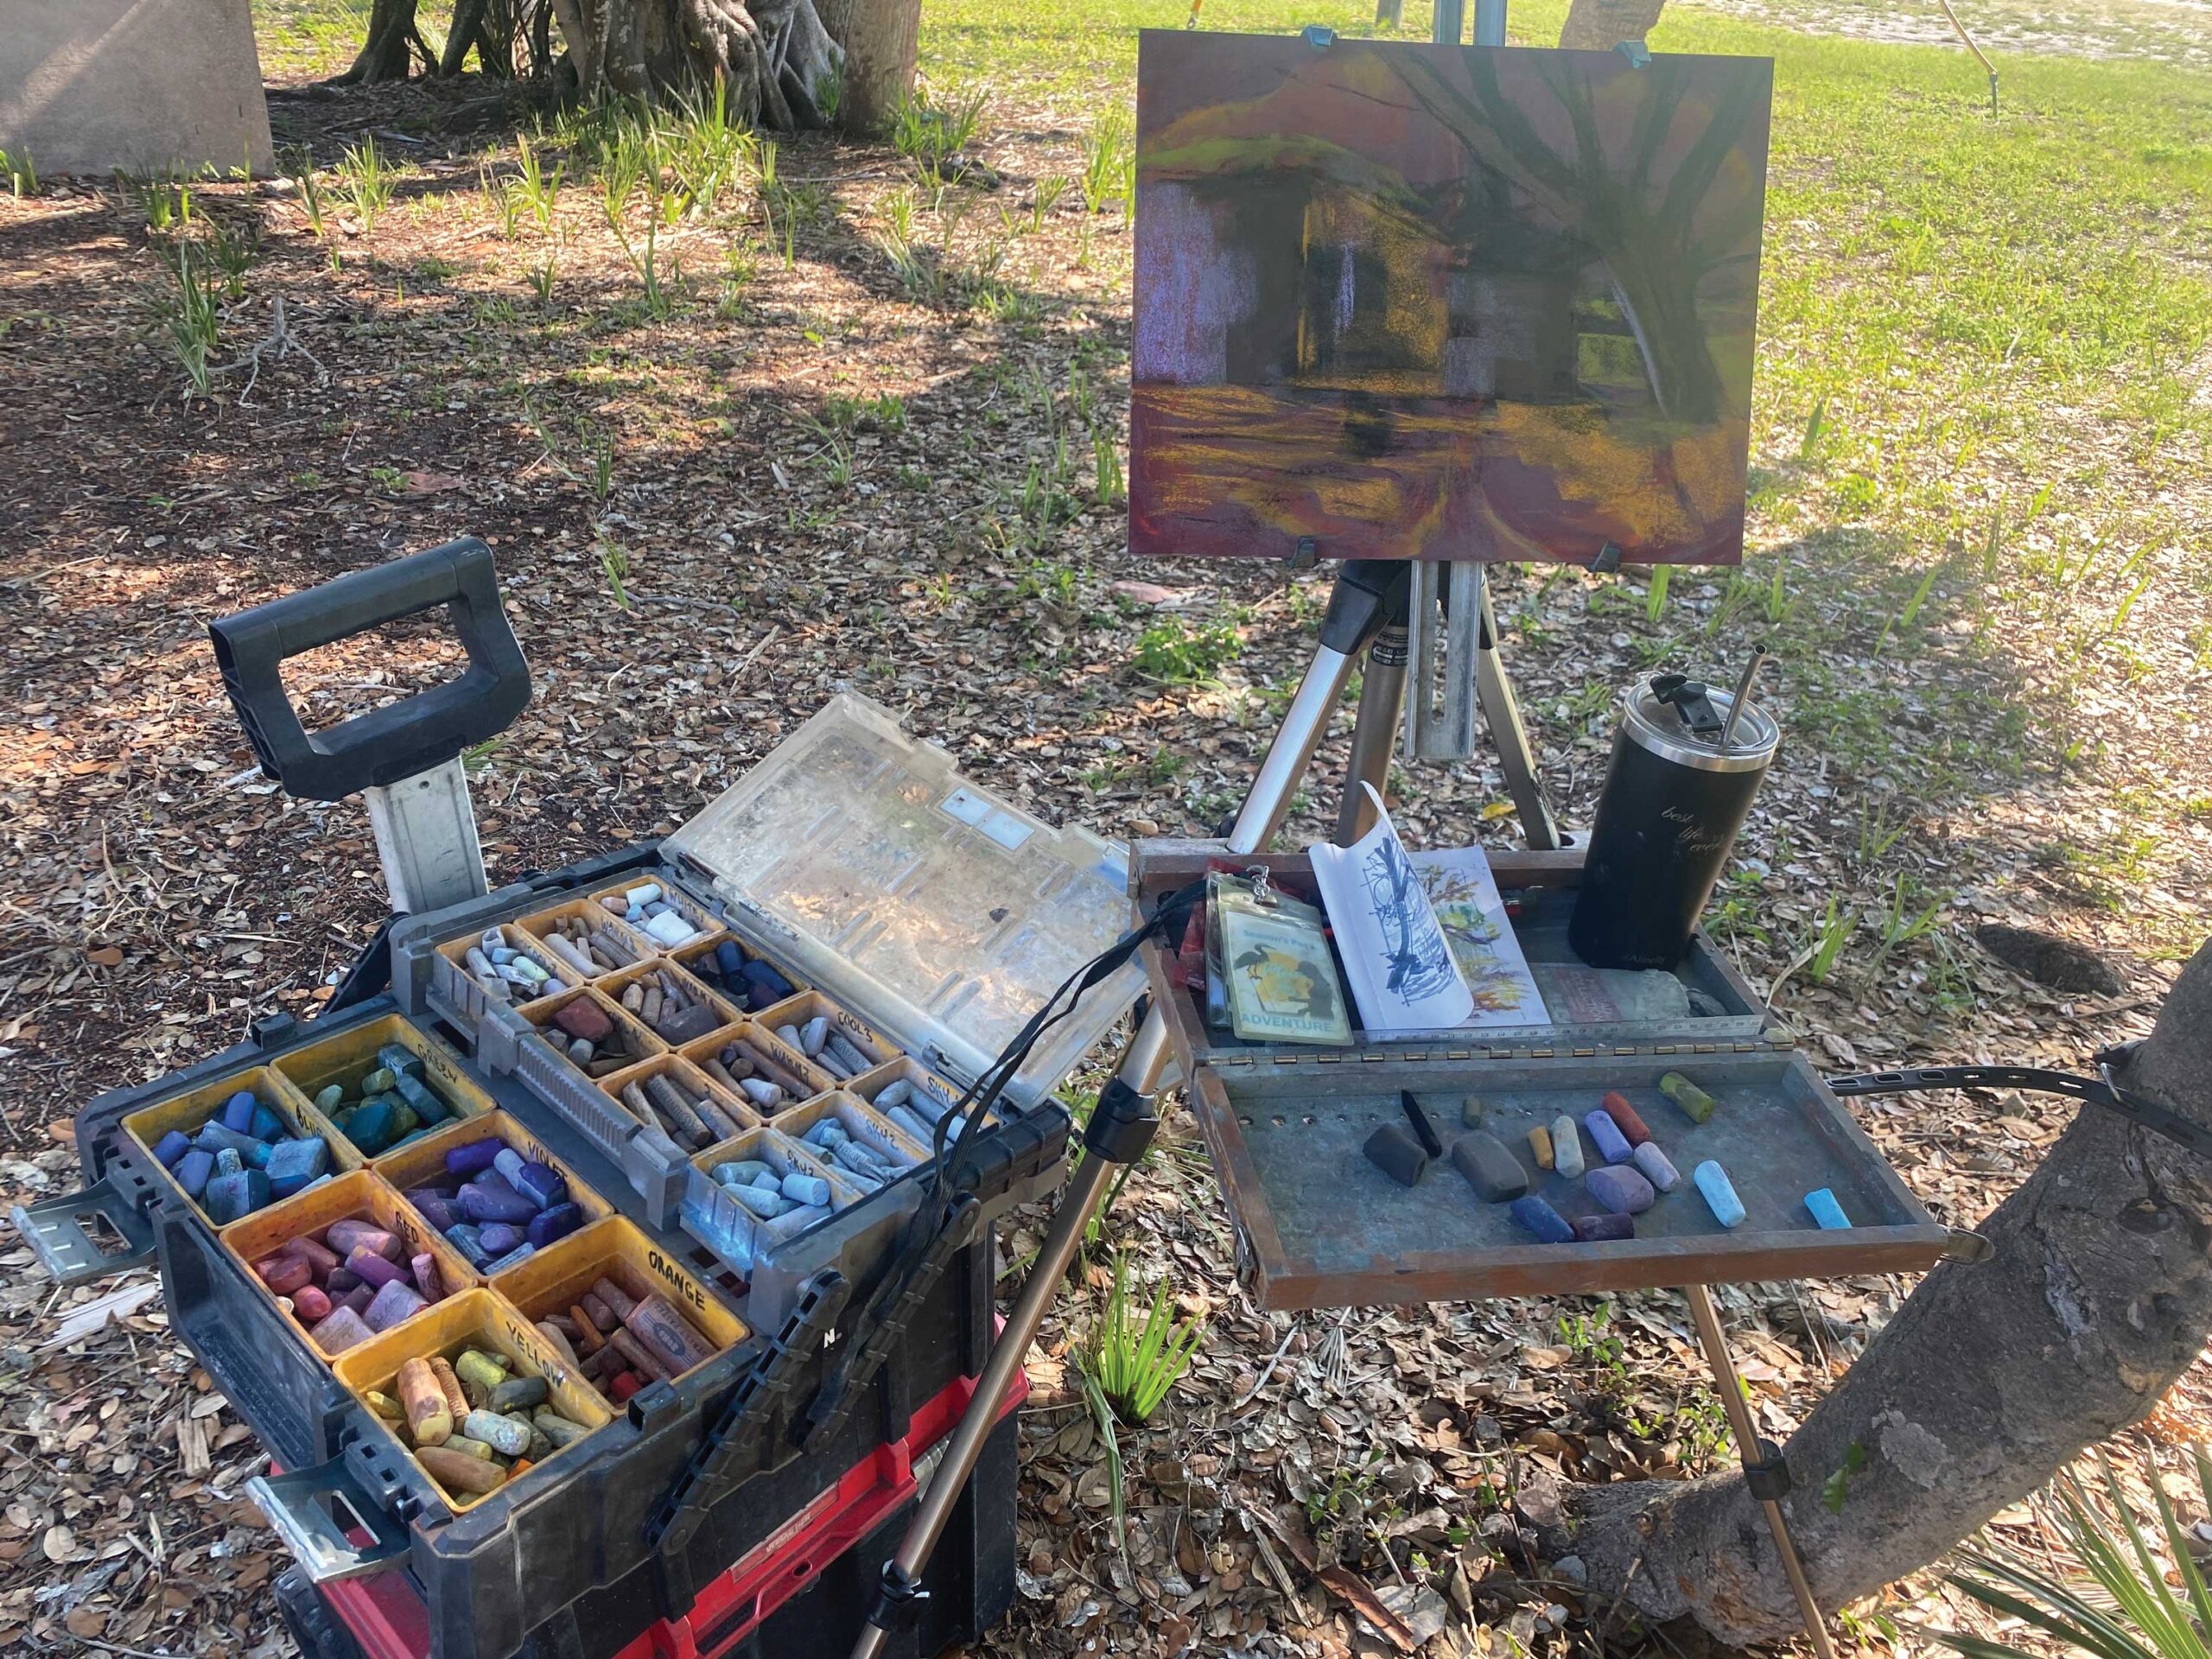
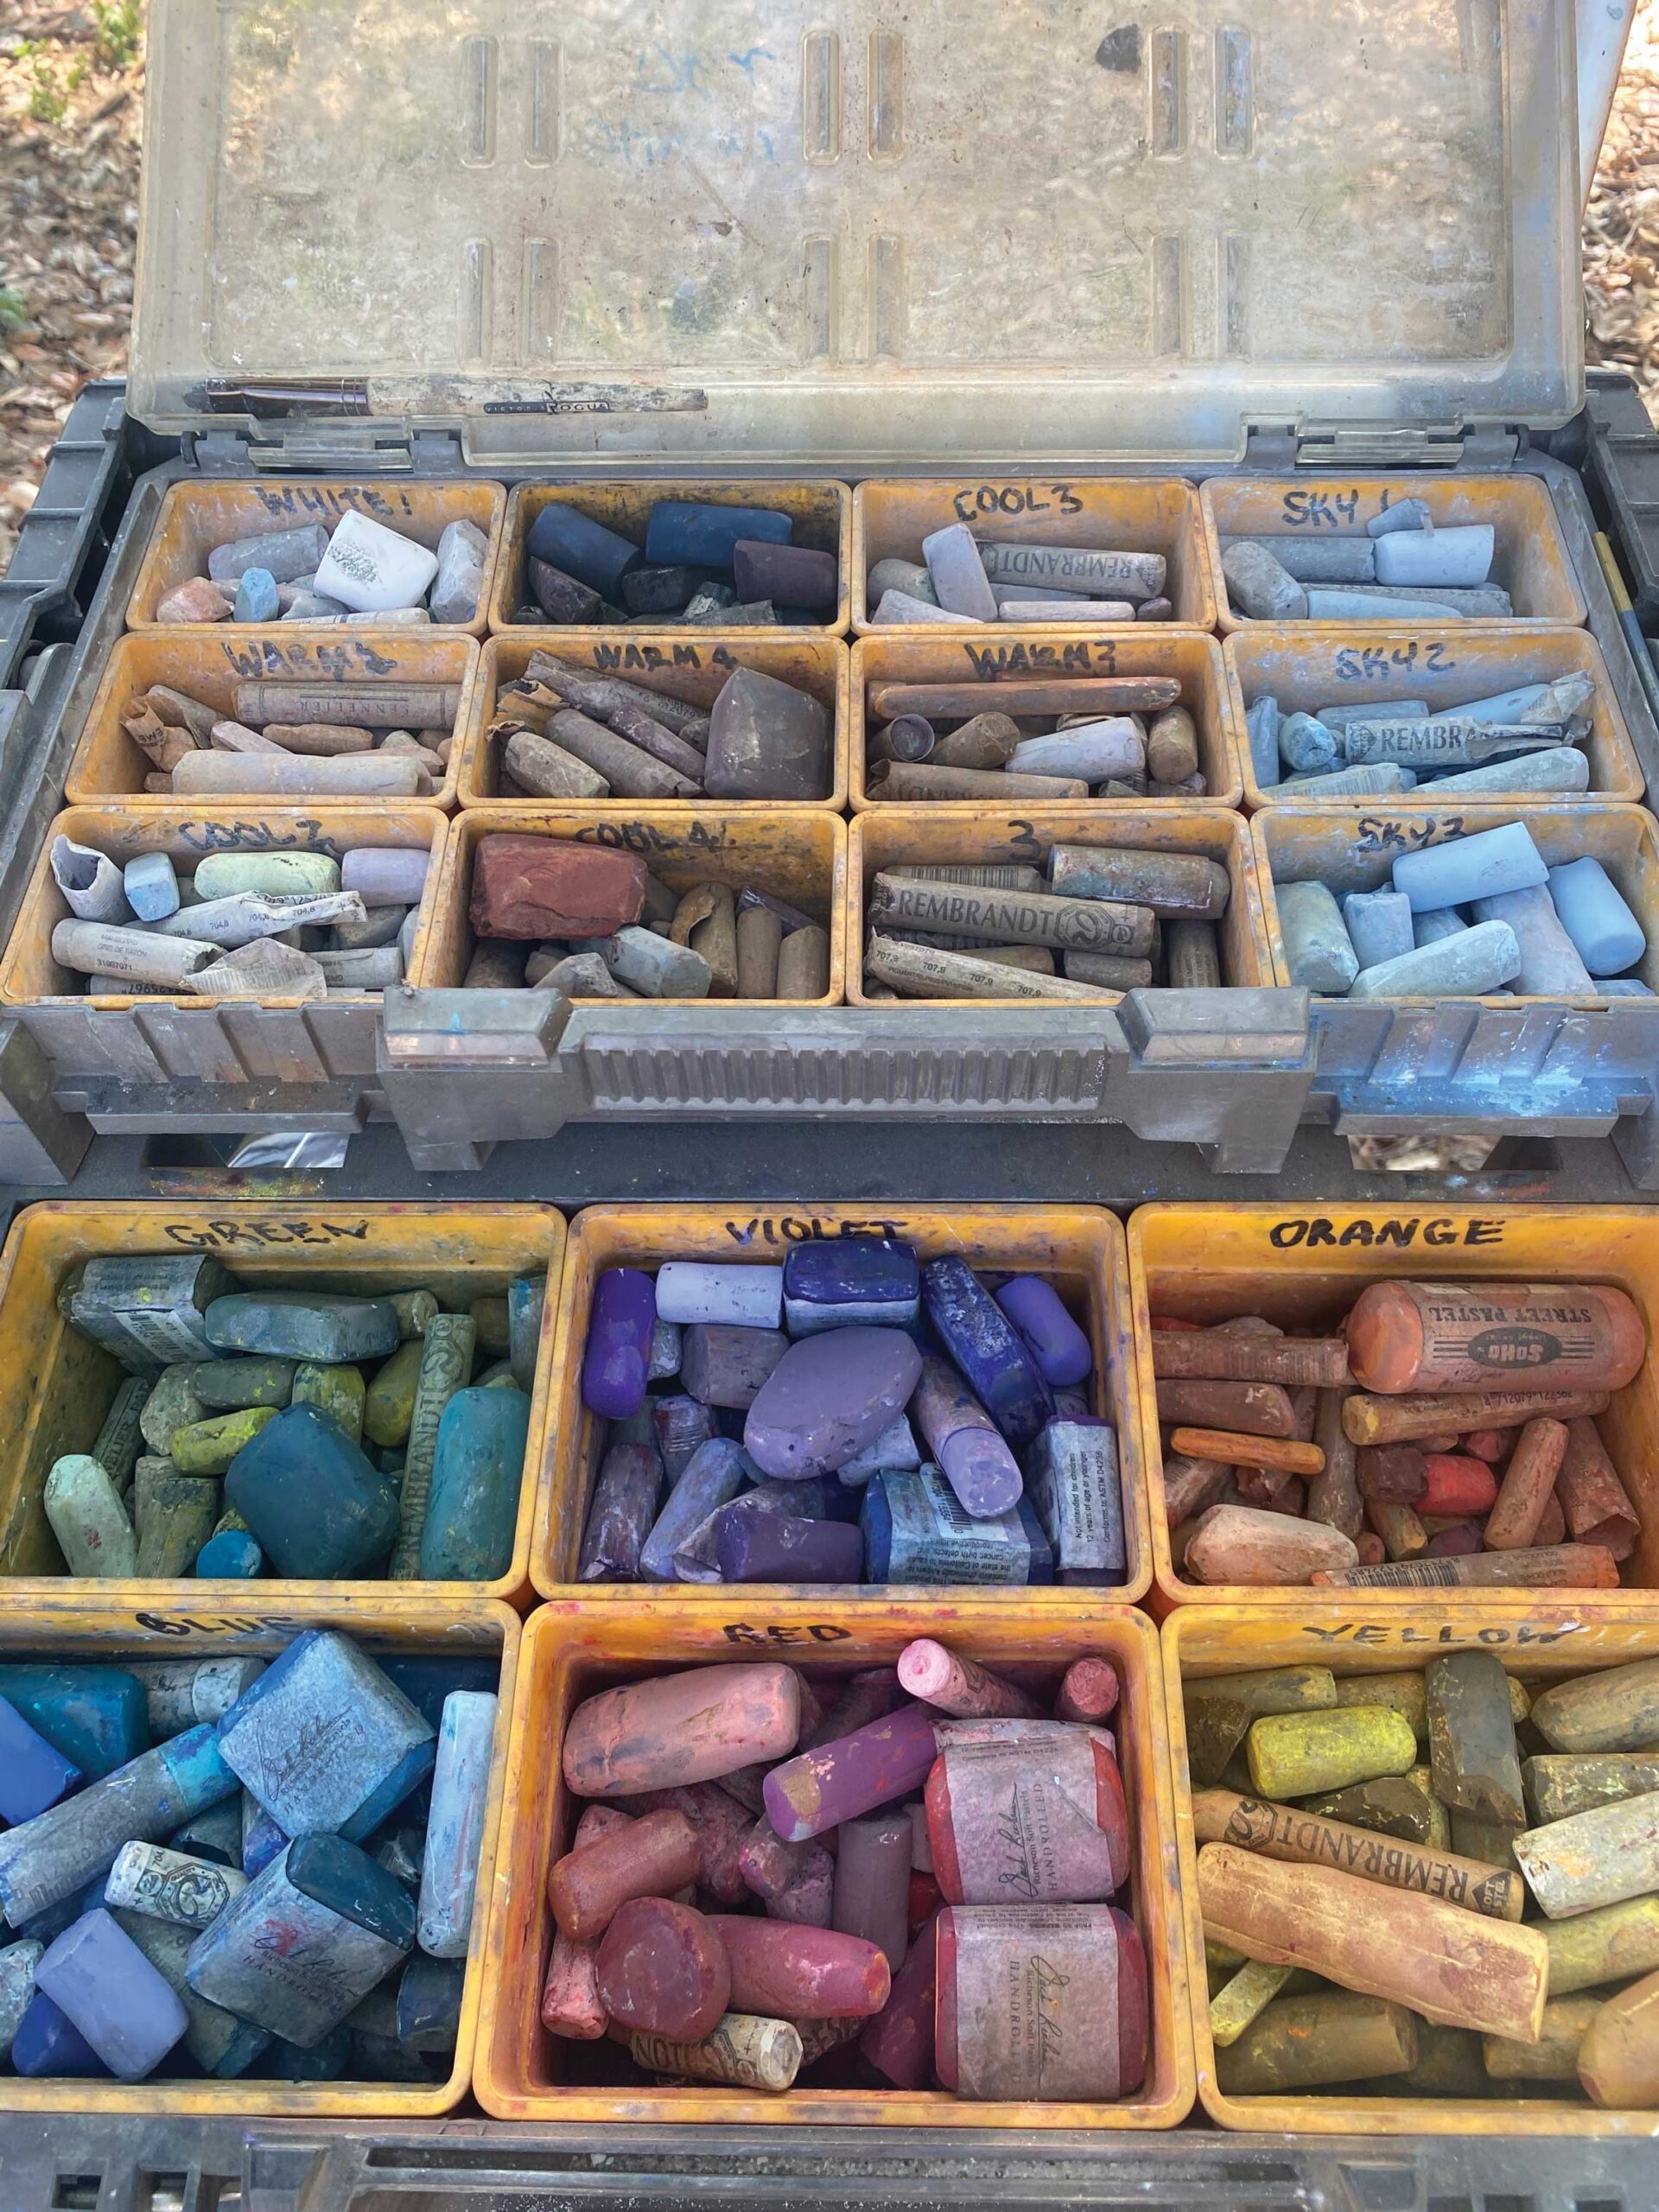
“The toolbox has small compartments that work perfectly for my pastel organization system. I arrange the top trays according to value and color temperature, with warm neutrals from white to black labeled Warm 1, Warm 2, Warm 3, etc., as well as cool neutrals in five values, and sky gradations in three values. I keep my primary and secondary colors in the lower level of the box, and use beach sand in the containers to gently abrade the sides of the sticks and keep them clean. The sand has the added benefit of cushioning my pastels to reduce breakage. (I’ve used corn meal in the past for this purpose when I lived up North, but bugs are attracted by corn in the South, so I substituted sand.)
“I carry about 250 sticks in my toolbox, but I don’t use all of them on each painting. I start with a quick color study to determine which pastels I’ll use for a specific piece. These are the only ones I keep in the small tray attached to my easel (I call this area ‘VIP seating’). If the easel blows over, I may lose a small handful of pastels, but not all of them.
“My plein air setup includes a tripod and a Packout toolbox with wheels that carries all my teaching materials, first aid kit, and other items I need on location. I use bungee cords to keep it all together as I schlep my equipment from my van to the painting site. Once I’m set up, I use the bungee cord to attach the easel tripod to a tree, fence, or the Packout for added stability.
“I also use pastel boards instead of paper. Paper pads and paper taped to boards can sometimes lift up in the wind. After having chased my paintings down the beach more than once, I switched to boards, which are heavier, don’t blow off, can withstand light rain without buckling, and lie flat in frames regardless of the humidity.”
Australian pastelist Lyn Diefenbach has her own unique method for keeping her paper in place in windy weather. “Before leaving home I tape at least four sheets of pastel paper (one on top of the other) to a foamcore board,” she says. “Each piece is separated by a sheet of glassine that will also serve to protect the finished work. The entire bundle is then topped with another piece of foamcore and clipped together with bulldog clips.
“As I complete a painting, it gets re-covered with glassine and attached to the covering piece of foam core with the clips. At the end of the day, I simply put my top and bottom boards (with my work between) back together with the clips. There’s no chasing after flapping paper, and I arrive back home with my paintings in good order.”
Problem 2: You get caught in the rain with your pastels.
Solution: “Even a light sprinkle can quickly ruin a pastel painting and potentially damage your sticks,” says Kathleen Kalinowski. “A painting umbrella can buy you some time while you put your materials away, but I recommend having a large plastic garbage bag on hand to throw over your easel and toolbox just in case you get caught in an unexpected rainfall.”
Problem 3: Your paintings end up a dull, muddy mess.
Solutions: “Sometimes, students — and even more experienced painters — can kill a painting almost from the get-go,” says Heidi A. Marshall. “They rush in, get heavy with pigment, and things quickly go from bad to worse. In an attempt to make corrections, they’ll paint over areas again and again, and soon there’s no tooth left to the sanded paper. What is left is a muddy mess. And if they try to reestablish the tooth by brushing off layers of pastel, clouds of dust fill the air. It doesn’t need to come to this!
“The remedy is to establish a feel for the medium and to make a plan of action. To start, practice making various marks to gain an understanding of what different brands and hardnesses of pastels can do. It’s like a violinist learning a variety of expressions with a bow; the pastels are our instruments, and we need to learn how to play them.
“From the outset of a plein air painting, it helps to employ a global approach that quickly establishes the relationships in a composition. A hard, dark(ish) pastel stick can lightly fly over the page to thinly establish the landscape and its values. I use the side of a hard pastel for this and work fast and loose, employing more pressure where values are darkest and less in light areas. The idea is to build the painting incrementally. Want to enhance the gorgeousness? Talk to yourself as you paint. For example, ‘I love the way these trees mimic the movement of the clouds.’ Suddenly, you’re painting poetically. You’re involving your mind and heart — and your voice. You’re considering beauty at every turn. You’re engaged.
“Once you have a painterly impression that isn’t weighed down anywhere, it’s time to use medium soft pastels. Now you can gradually begin to build things up a bit. Establish your darkest darks more emphatically — bring in warmer tones where things turn under, away from the light. Establish your lightest lights and mid-tones a touch more. If it’s a clear day, remember to add a blue influence — always staying light with your touch. Again, working in increments is the name of the game.
“By doing so, you’re building to a kind of crescendo in your work. It starts to not only look like something, but feel like something. Lastly, get out your softest buttery pastels and add the finishing touches. Check your edges. Do you need a sharp line? Think stylistically. Perhaps you need small glints of light here or there, or a vibrational layering in the sky. Maybe you feel compelled to add some bits of color that aren’t necessarily in the scene, but you just know they will add to the beauty of the painting.
“You can do this! Work in increments, enjoy the process, and I promise you’ll breathe new life into your work, and make your paintings come alive.”
Browse more free articles here at OutdoorPainter.com


