

Today I am writing about some fundamental questions concerning the presence of a focal point in a painting. I will also explore the difference between a painting that has some excitement, as opposed to being just dull and boring.
When teaching, I have often been asked “What’s wrong with my painting?” It’s not always the easiest question to answer. Perhaps a better way to approach this would be to ask, What’s working and how can I improve what’s already there?
The colors and values might seem right and the drawing may be relatively okay, but it may still lack that certain something that makes you want to look at it for very long! It might be that the painting just lacks a center of interest, as well as some secondary points of interest. In other words, it doesn’t have any “hooks” to capture the eye, which make the viewer want to explore further.
So what is a “hook,” and how can the artist create these areas of interest in their work? The answer to that question lies in the principle of harmony and contrast. If you look at any scene in nature during the daytime, you will notice that most of what you see lies somewhere in the range of mid-tones, with darks and lights scattered here and there. These areas of contrast are the ingredients that create excitement and a sense of form. There are other contrasts as well. Contrasts of mass versus linear elements, contrasts of color, color temperature, color saturation, and value. Additionally there are also contrasts of size, shape, and texture, to name a few.
Using this idea to execute better and more interesting paintings requires the artist to create areas of interest that differ from the main body of mid-tones that we see everywhere. These mid-tone areas usually take up the largest amount of space in the visual world. It’s important that a painting have several contrasting areas, which give spice to the work, in the same way that nature has. As artists, we can enhance certain aspects of these differences for good effect in our work. These, then, become areas of interest known as focal points, with one that dominates, as the center of interest.
This idea of a center of interest can sometimes lead to confusion. In my painting classes over the years, we’ve had many discussions that have sparked more questions and led me to ponder the real purpose for a center of interest in the first place. I think it’s important to point out that a center of interest should not be some sort of “bull’s eye” that the viewer obsesses over, to the exclusion of all other areas of the painting.
My personal view is that a center of interest is a place in the painting where the eye tends to start out, or wind up, pausing and then moving onward along a path of visual exploration. How important this area is will dictate how much time the viewer spends there (more on that in a minute). This understanding allows for other hotspots in the design that don’t detract from the original but that lend interest and support, which ultimately leads back to the central area of interest.
Another aspect of a center of interest is that it need not always be the subject of your painting. It might be an area, or an object, that acts as a foil for the real subject. Picture for a moment a single fence post, which is in shadow which is silhouetted up against a large expanse of sunlit, cloudy sky. The vastness of the sky and its interesting forms may be what the artist was trying to convey to the viewer and is the subject of the painting. By itself, this subject might not have had enough excitement, and therefore the artist gave it a “hook” (the fence post) to convey scale, along with a bit of linear interest. In this case the center of interest produces a very strong visual pull and the viewer will go to it immediately, but it is not what the painting is really all about — the subject is the sky!
Another example could be using this same sky, only this time with a twist. This time the artist could decide to eliminate the fence post altogether and opt for a small area of the sky to act as the main focal point. This could be an area of the sky that has more value and color contrast than the rest, perhaps a single cloud that acts as the central focus but that, again, is not by itself the subject of the painting.
So, when are the subject and the focal point the same? Here is a different example: This time the artist is enamored with a large rock and wants to paint it. The artist then paints this subject within the context of the landscape, giving most of the visual attention to the rock, by using hard edges, more color saturation, value contrasts — you name it — to enhance its importance in the picture. Yes, there are other lesser areas of interest in this landscape, but they don’t compete with the rock. You now have a painting where the center of interest is also the subject.
This brings up one last aspect on this idea of a focal point: Does it always have to be strong? On this point, I would say not necessarily. There really are no rules, just tried and true ideas. It really comes down to creativity based on visual observation and imagination. Some paintings call for a strong focal point and others don’t. It’s a matter of degree that is tempered by artistic taste and purpose. (If there were a formula to painting masterpieces, there would be no room for real artists, just technicians!) In one painting, it could be the vastness and loneliness of a desert. Could the lack of a strong focal point actually help in this situation? You be the judge.
The next time you are wondering why a painting you are working on seems dull and lifeless, think about this principle of harmony and contrast to see if you can come up with the answer. You may just need a hook to make the piece sing a little louder.
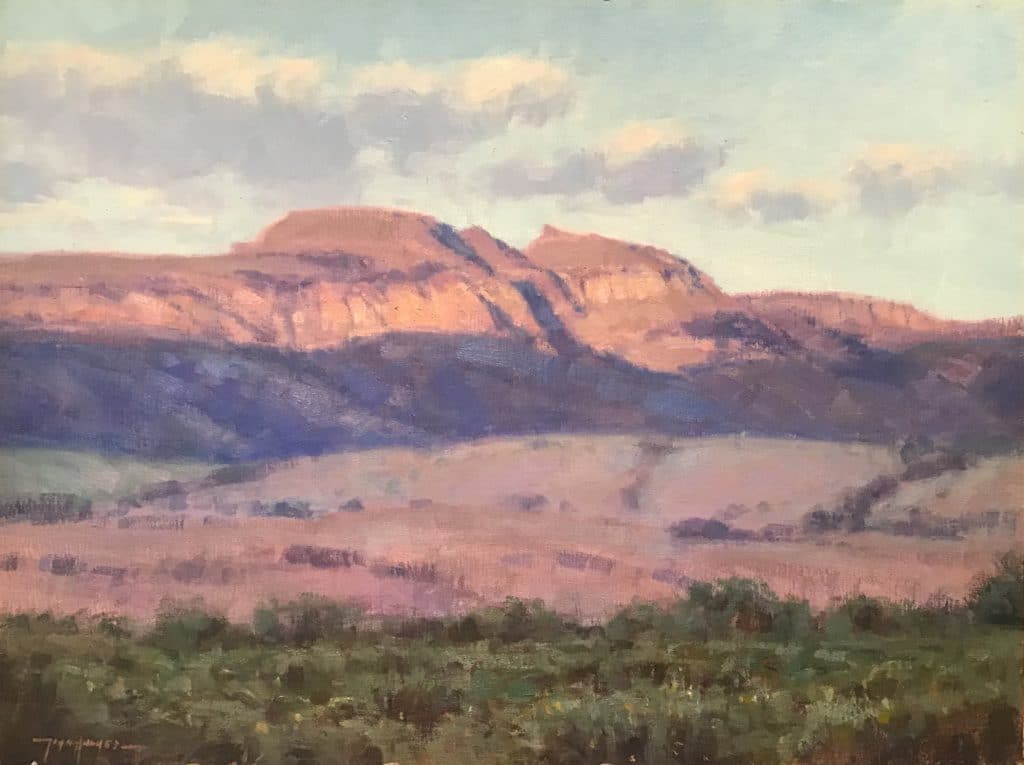
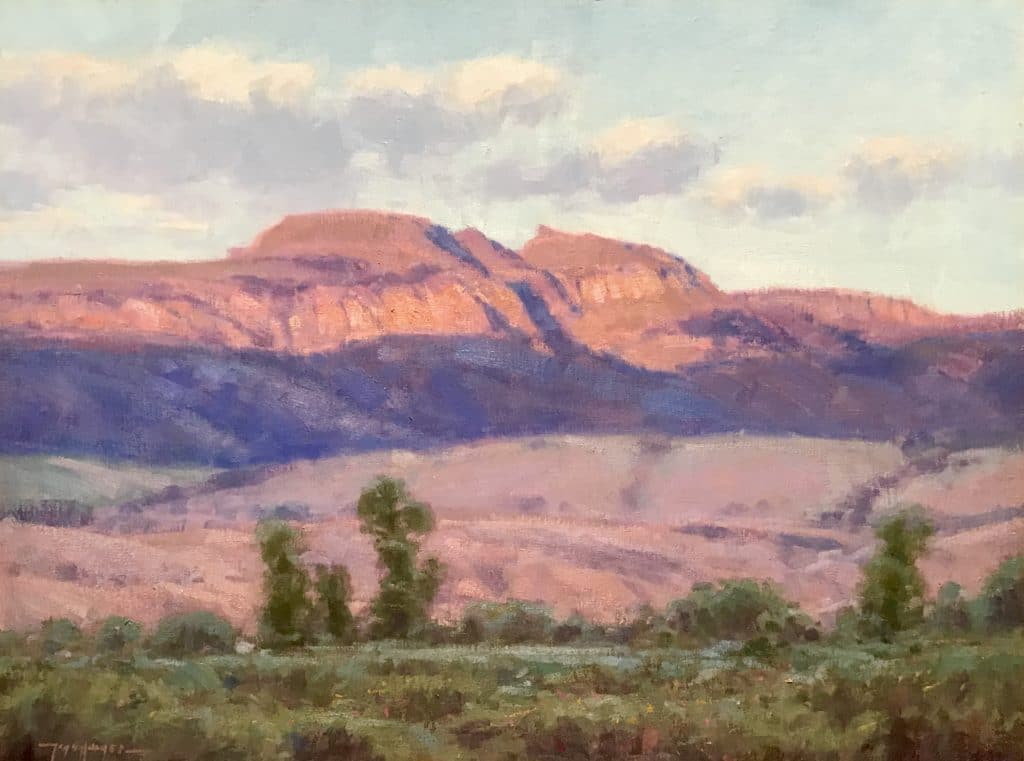
Below is a painting that I recently pulled out of a bin in my studio to rework some things that were bothering me. My term for this is taking a painting “through the car wash.” It just means to clean it up a bit and make some needed adjustments! In the first example, it has a focal point (the rock outcropping), but it lacks interest in other parts of the painting. The addition of some cottonwood trees in the middle distance was just what it needed to counterpoint all of the interest in the rocks and give balance to the whole. The “Sleeping Indian” was interesting to me when I first painted it, but I sensed a need for some more interest on the ground plane. The cottonwoods now act as a balancing weight as secondary and tertiary focal points for the real subject. They also lead the eye into the picture and up the rock formation, which operates as the subject as well as the center of interest.


Your simple changes seem to bring the darker ground plane closer to the viewer. The darker trees help illuminate the warmer lighter rock colors as well as making the plane seem flatter, more horizontal.
I think you are right. Thanks for your comment Roberta!
[…] the clutter caused by too much detail in your painting. Thus, it is best to just emphasize certain focal points and leave the rest of the artwork to the imagination of the audience. The focal points of your […]