

New to painting en plein air? You’ll enjoy these tips from Tamera Menard Ovall’s new book for artists, “Plein Air Painting Tips and Tales: Memoirs of a Michigan Plein Air Painter” (available on Amazon).
BY TAMERA MENARD OVALL
(tameramenardovall.com)
Some people try to clear their mind and focus on their way to paint. I don’t really mentally prepare myself to go out painting. I am always ready to paint. All of my life, I’ve seen paintings everywhere I look. There will never be enough time to paint them all. I am constantly taking photos of good compositions. Because I taught at a public school full-time, I had to “steal” the time to paint. Some days, I would paint on my lunch hour or during my prep time. I pull out my easel and oil paints in restaurants and do fast little paintings. They sell right there on the spot.
There is an enchantment to be found in the process, I promise. Don’t be afraid to record what you see. A fellow artist once put it like this: “If you can paint a rock, you can paint a nose . . . just the same as if you can drive to the corner store, you can drive across the country to California.” It takes the same skills.
I recommend using a viewfinder and doing a tiny preliminary sketch. If you can visualize what the completed painting will look like, that is great. Things in nature aren’t always organized the way our mind thinks they should be. Remember that nature is random, but you can edit the scene. When all else fails, just paint what you see.
You can paint anywhere, even on the side of a road, but always be aware of your surroundings. I don’t recommend painting alone in a strange place. If you can join or create a weekly plein air group, I highly recommend it. The group becomes like a family to you. Spending time with other artists is both inspirational and educational.
When you look back at one of your plein air paintings, you will remember everything, even more so than when you look at photos. This is because you fully experienced every sense at that moment and recorded it—the sounds, the smells, the humidity, the temperature, and any other experiences in the adventure that day.
The average time for a start-to-finish painting is roughly three hours, so you need to edit down what you see. Pay attention to changing light conditions and don’t chase the light. In other words, don’t constantly change your painting as the light changes. It’s good to keep a plein air session brief. Painting in one session, called alla prima, is painting wet-on-wet. Most of my paintings are done alla prima.
I recommend the one-eighth-inch Masonite board. I sand and gesso one side. Then I tone that side with a burnt sienna washed/thinned with turp for an under color. You can seal the back side with latex paint so it won’t warp from moisture.
Get out your li’l sketchbook and your viewfinder and doodle some different possibilities. Vertical or horizontal? Paint something that moves you. First, do a monochromatic sketch for values (that means one color), then fill it in with color. YES, use oil right on the paper. I use the pen to give space for it to dry while storing the book in the side pocket of my leather DaVinci bag.
Take a deep breath; no pressure. Squint and simplify the scene. Try to break the scene down into a few large masses or shapes. Look at the scene as values and shapes. Once you block in these shapes, the hard part is done. I always do a sketch in my book first to be sure the composition works for me. Sometimes, I learn that I don’t like the composition in my sketchbook and do a second one. Knowing what doesn’t work ahead of time is just as important. If you have a bad composition drawn, it won’t matter how much time and paint you put into it. It will still be a bad composition. You won’t like it. Plein air painting is a race against time, and working out a small sketch ahead of time can save you priceless minutes.
If determining the values is a difficult task for you, then you may want to purchase some red sunglasses or a red value finder sheet. I cut down a red sheet and keep it in my sketchbook for days when the values are trickier. You may also want to paint a black line and a white line on your grey viewfinder.
Things in the distance (further away) are smaller and less detailed. They are lighter and often blueish and flatter with soft, fuzzy edges. As things get closer, they get bigger, which creates depth.
Related > Paint By Note Value Specs available here!
Usually, the first painting step is to block in the darkest darks with broken color so that it looks like a lot of nooks and crannies are in there. I even place the darkest colors first when I do studio paintings. (This is not a hard rule. There are always exceptions.) The reason to place the darkest darks first is that they stay dark and pure. I placed them in the serene river painting below. Once you add a lighter color, it makes the dark milky and washed out. Notice in the Santa painting how the darks and lights are separate. In oil, you paint from the dark to light and from thin to thick. If you start with clumps of thick paint, you will have a mess.
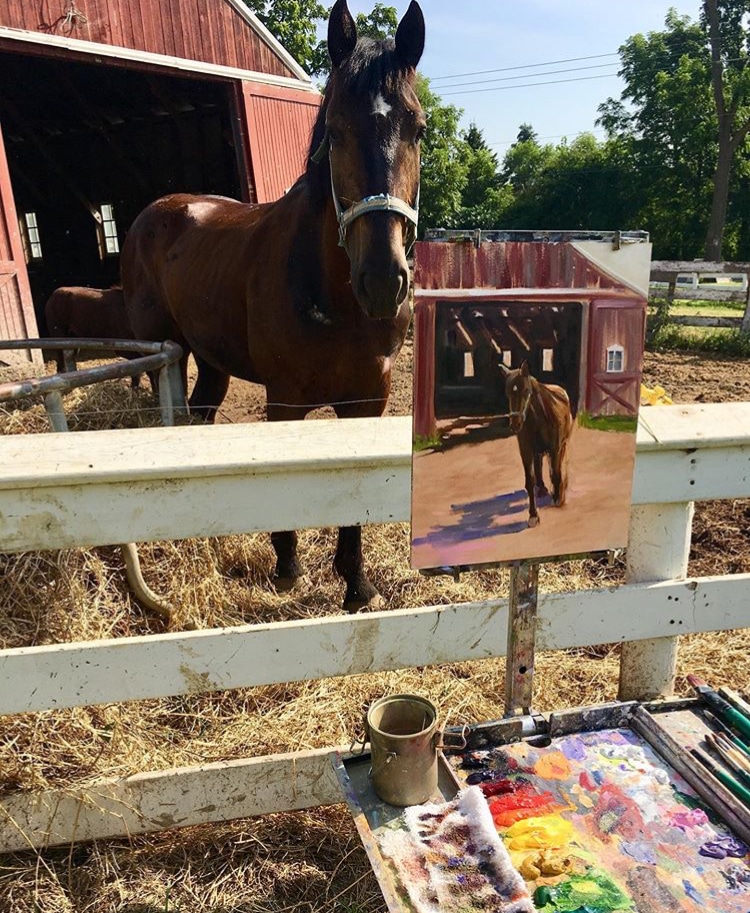
If you are painting barns or structures, you may need to draw them in first with the brush. Structures are best to paint on sunny days so that you can see the contrast. Shadows add dimension.
Work from far away to up close (sky first after the darkest darks), then fill in the entire board with color/values (with thinned out paint). You will have a lot of inner dialogue with yourself. There will be times when you paint fast and slow. You will feel emotions of pure joy and excitement, as well as fear and frustration. This is all completely normal and part of the process.
Don’t try to paint every leaf. Squint and paint big shapes and values. Start with dark masses, and then go lighter. Don’t get trapped in the details. Remember the economy of minimal brush strokes. Put a stroke down, be bold, and leave it alone.
Save highlights for last. The highlights are the fun part. Consider highlights to be the dessert after a meal. Highlights can have dramatic effects on a painting. If applied properly, highlights can evoke an emotional response from the viewer. Be careful, because sometimes the magic is in the subtleties, and too much ruins it.
You are painting the impression of the scene. Do not try to duplicate it like a photo. Cameras do that. Nothing is too hard to paint. Remember, if you can paint a rock, you can paint a face. Same principle. Simplify your thoughts. Subtle finishing touches make it believable, and the viewer’s eye fills in the rest of the story. Let nature be your muse.
Wash your brushes right away so that they don’t dry up and get ruined. First, I scuffle the brushes in the turp can and remove as much paint as possible. Then I use Lava soap with warm water and a brush-cleaner.
More Tips for Painting en Plein Air
• Never think you have to go out looking for the perfect spot to paint a magical scene. There is inspiration everywhere. Have you ever really looked at the wonder in your own backyard? Try it! You could paint the same exact location every day of the year. Line up all the paintings in a row, and every one of them would look slightly different. In the process, you would become much more artistic and creative. If you decide the tree is purple and the sky is pink, it’s okay. You’re an artist.
• Every artist goes through frustrating stages during this process, no matter how long they have been doing it. We call these stages “the uglies.”
• Every single artist makes mistakes and needs a fresh eye from another person to point things out.
• Everything starts with simple shapes.
• The beginning is the most important. Look twice, paint once.
• Practice drawing ellipses. Your sketchbook should be your constant companion. Practice, practice, practice.
• Clouds change size in aerial perspective and are larger at the top.
• Use a loose brushstroke. Hold the brush lightly and constantly move it.
• Economy of brushstroke = Place it and leave it. DON’T MUDDLE OR YOU WILL GET MUD.
• Reflections mirror exactly what is above them, and all water is not blue. Remember to LOOK and paint what you SEE, not what you assume is there. The water will be blue when the sky is blue. Below the water are dark reflections too, but you still know it is water.
Upcoming travel and art events with Streamline Publishing:
> Click here to subscribe to the free newsletter, Plein Air Today
> And click here to subscribe to PleinAir Magazine so you never miss an issue!


I saw this book recently and it would be very helpful to a beginner oil plein air painter. There are paintings pictured in stages from beginning to end and many tips.