

While recently writing up a learning experience for some of my classes and workshops, I thought I might share this valuable exercise for painting landscapes with my readers at Outdoor Painter. It will also appear in a chapter in my up and coming book, The Landscape Painter’s Learning Guide (What I Wish I Knew When I Was First Starting Out), due out sometime next year.
In order to better understand the properties of light, which is so vital for landscape painters, just observe nature for one hour before you begin to paint it. The assignment is as follows:
When you arrive on site, take a sketchbook and a pen or pencil, along with a camp stool, and just walk around observing what you see. When you find a scene that interests you, pick out one element at a time and make an intensive study of it before assessing the rest of the scene. This will require some concentration, so some of you may want to sit for a while making mental notes before recording what you are looking at in your sketchbook. The following aspects of light should be your main focus: How do the light and shadows look on various elements of the landscape that you are studying? You might start by sketching, along with making accompanying notes of what the quality of the light is, such as strong sunlight, diffused light, or overcast.
It’s important to gain understanding in this way, before trying to depict in paint what you see. After determining what the quality of light is, pick out an object such as a tree or a mass of trees as one example. When painting landscapes, ask yourself questions like: How does the light on a particular tree transition into shadow within its own form? Is the transition from light to shadow gradual or abrupt? Most likely it will be gradual, since we are dealing with a form shadow on a typically rounded object, but there may be exceptions.
Edges
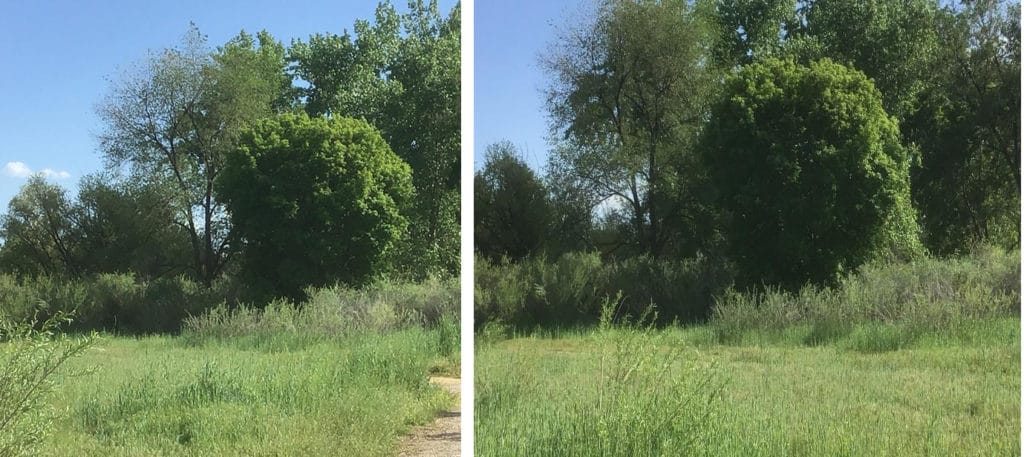
This brings up edges. How does the quality of an edge affect the way light is depicted in your painting? Let’s look at some specific examples using the photo below.
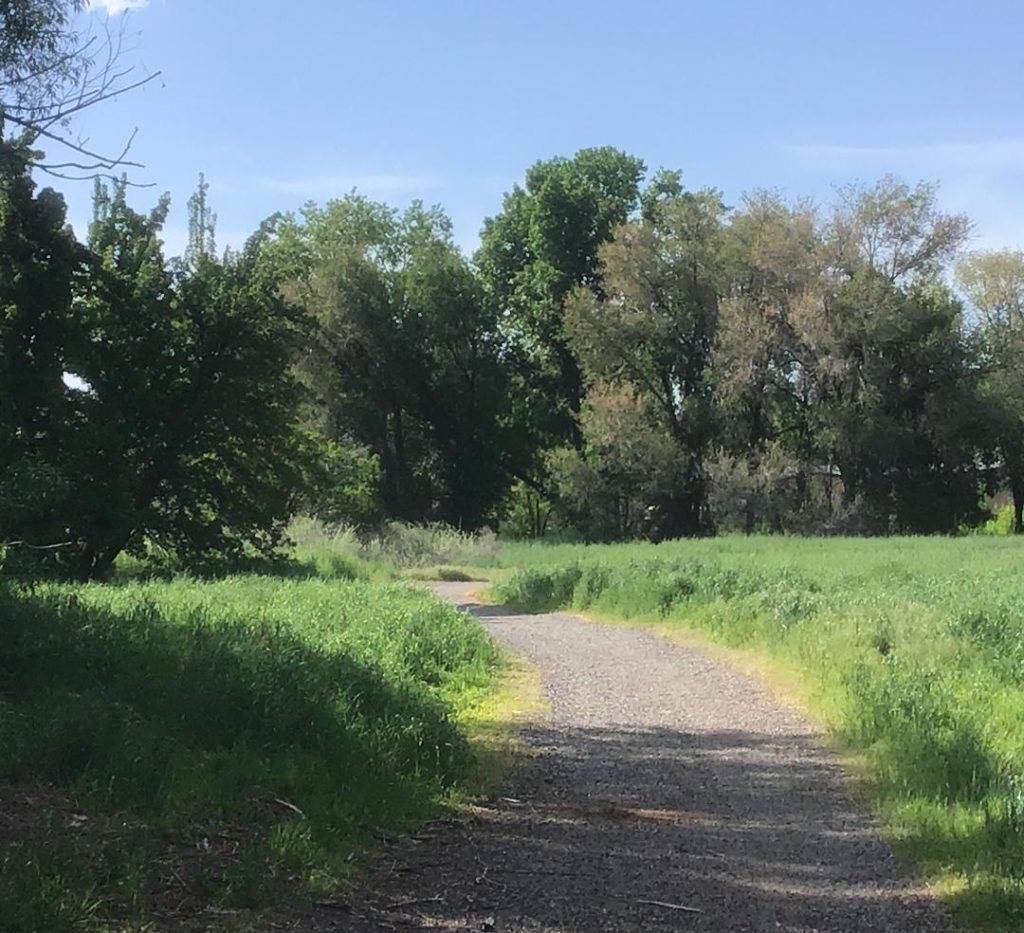
Notice how the sunlight, which is coming from the left side of the photo above, hits the edge of the central tree against the sky. The edge is well defined, darker than the sky (even though it is in direct sunlight), well integrated into the sky, and does not look cut-out. A “cut-out look” is objectionable when the mass of a tree ends too abruptly, with a razor-sharp edge up against the sky tone.
Getting a quality edge is accomplished through several means, which can all work together on various segments of the form: Sculpting the edge of the tree with a well loaded brush full of sky color is a good starting point. The negative shape of the sky is used in such a way to shape the positive shape of the tree.
Softening where needed with a clean brush or palette knife can further enhance the edge.
Applying the paint in drybrush fashion, with a fully loaded brush and the handle almost parallel to the canvas can add broken textural effects to the edge. In this position, draw the brush quickly across the form with hardly any pressure and no medium, unless your paint is too stiff to flow right out of the tube. This will cause the paint to skip over the weave of the painting surface, depositing paint in random patterns.
Transitions
Observe how the sunlit side of the tree above gradually moves into the shadow with no hard edges. That’s because it is a form shadow on a rounded object. This form shadow is then acted upon by another specific harder edge, from the tree in front of it. This tree also transitions gradually into a form shadow. The only semi-hard edges are where the sunlit side of one object comes up against the background of a starkly different value.
Painting Landscapes: Odd Light Shapes in Nature
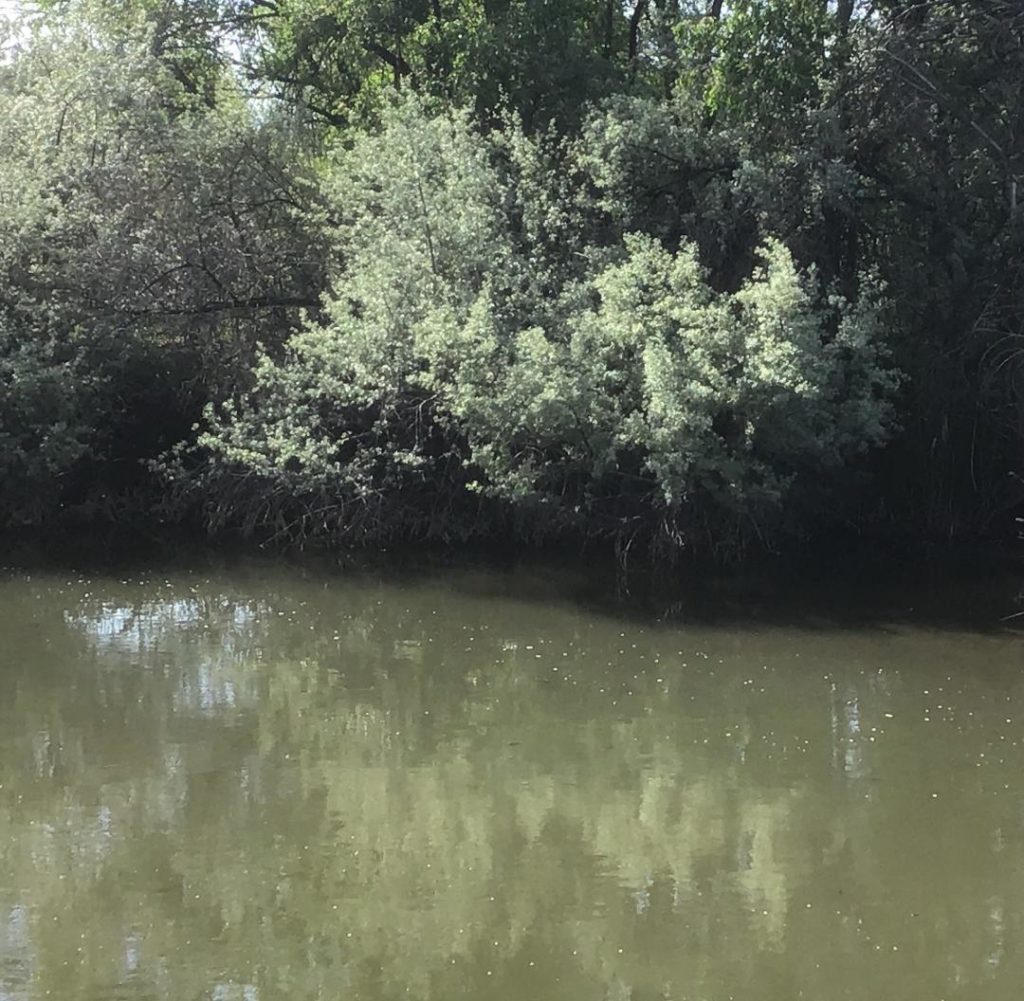
This is getting into the area of design a bit, but when talking about one aspect of painting, it is often difficult to present it in isolation. As in the photo below, there may be some protruding branches with clumps of leaves in sunlight, which abruptly jump out of the shadow side of the tree. These clumps present themselves as a hard edge against the form shadow of the tree and may be too jarring for the design. Would it be wise to paint them like that, modify them, or leave them out all together? Perhaps a change of edge, value, or shape will work.
In the above photo you can see this concept at play in the central clump of leaves, which are lit up, along with the bottom edge of the other large sunlit area. Both would need to be painted in such a way that they will not draw negative attention to themselves.
Below, I have used the same photo as the one above and very roughly edited it digitally to show you what I mean. Notice how the stark contrasts that were evident before have been toned down, in order to make them work more harmoniously with the rest of the scene.
That’s the nice thing about being a painter, you are not stuck with things that would subtract from your artistic message; you can just change them!
Really Weird Shapes
While we are on the topic, do you see anything strange in the photo below? It looks like a giant arrow or rocket ship just crashed into the left side that tree and came out the other side! Wow, you wouldn’t want to paint it that way, would you? No, neither would I, and as painters we know what to do, right?
These are some of the types of things you will want to notice about your scene before grabbing your painting gear. Try sketching a diagram and make note of things you would change as well as the things you would keep. You will also want to make note of what the main value of the shadow is and how big a value jump is necessary for the sunlit side of the tree to read correctly.
Doing the Math
Let’s start with a little math exercise. Using this same scene, the main shadow of the foreground tree may look very dark in comparison to the sunlit landscape behind it, but is it really that dark when you take into consideration that there is reflected light in this shadow? If this same tree were placed further into the middle-ground, we would also be dealing with some atmosphere as well.
Many beginners will paint these shadows the value of black, especially when they are working from dead photo reference. Again, is the shadow really going to be that dark? The answer is no. So, how dark should you paint it? Using our understanding of reflected light and observation, we can begin to get the answer.
You will most likely notice that there is a deeper shadow within the interior of the tree, which is darker than the leaves. This is always harder to see in a photograph, but hopefully you will get the idea before you go out for yourself to observe this in nature.
Here, you can assign a value based on this observation, along with the reason. Due to things like atmosphere, these deep, dark shadows on tree trunks, branches, and undergrowth are most likely not going to be black, right? So just for argument’s sake let’s say that this tree, which happens to be in the foreground, has a deep, dark shadow at a number 8 value, on a 9-value scale. (If you paint it a 9 value, that wouldn’t leave you any wiggle room and nowhere to go if you need a darker note, so as Emile Gruppé used to say in his writings, “Keep something in reserve”.)
In order for the leaves that are in shadow to read like reflected light, you might be in the 6 range on your value scale. Then, where the main body of the tree is in direct sunlight, you may be into the 4 value range with some 3 highlights. At this point you might be thinking that you’d better hold your values as close together as possible in order not to run out of values for other objects in your landscape. This is because the values of the whole scene depend on believable relationships in order to read as light. In addition to that, the other values in the scene must be taken into account as well. There is the value of the sky, background field, other trees, and distant mountain. Do you have enough values left, or can some be duplicates with shifts in color temperature to add believability?
These are all things that must be understood and executed effectively in order to paint a successful landscape. (I hate to bring up math, but Mrs. McGillicuddy, your third grade teacher, was probably right when she told you that you would need it when you got older! Now here you are — admit it, she was right!)
Other Considerations for Painting Landscapes
Another question to ask about the shadow side of the tree is, What is the quality of the edge where it comes up against the background? Is it a hard edge, broken edge, soft edge, or even lost? Why?
Here is an example of a small tree in front of larger ones that were photographed from two different vantage points. Which one best shows off the silhouette of the shadow side of the little tree in front? Why?
As you can see above, the left photo shows off the edge of the shadow the best and displays the contour better than the same tree on the right. In the right photo, the contour of the edge in shadow is lost into the background. In the left photo the edge could be painted broken in order to mimic the natural interaction of foliage against sky; it’s a definite edge, but not brittle and hard.
Which of these two viewpoints works best? There is really no right or wrong answer here; it’s just a matter of being aware of these things and using them to best advantage in order to get the light effect as well as the design that you are after.
The Light Side
Moving on to other questions that you should be noting: How does the light side of the tree present against the background? There is a shadow behind it, so you have an opportunity for a harder edge where the light on the tree slams into the background shadow. Even though it is a hard edge, be careful not to make it razor sharp. As stated previously, natural tree forms normally don’t present that type of an edge, which would look pasted on.
Incidental Shadows within the Light Mass
How about the smaller shadows within the sunlight side of the tree? How will you handle these? If you paint these too dark, you may wind up fracturing the feel of a mass of light leaves. So be careful, and don’t paint them as dark as the darkest dark within the shadow side of the tree!
In the previous photo above, notice how these small incidental shadows on the sunlit side are naturally arranged into patterns. Take advantage of this natural arrangement and enhance it if you have to. If a natural arrangement is not present, make it so! Remember, we are creating art, not recording exact replicas of nature. One other point to note in the photo on the right, the contour of the tree is rounder and more predictable than the contour in the left photo. Which shape would you rather see in your painting? How could you change it? Remember, too much predictability can become boring, and that’s what we want to avoid!
Additional Points to Note
Other questions about the relationships between shadows and light might be things like, Are there clumps of leaves within the form shadow of the tree that create counterchange within the form?
Would it be best to group these lights and darks into more artistically designed patterns, or do they look good the way they are? How about a cast shadow, which is being cast onto the ground from your tree? (Refer back to the odd shaped tree in the park.) Is this shadow lighter or darker than the form shadow on the tree? What value is it? Is it warmer or cooler? Why? Are the edges around the perimeter of this cast shadow uniform, or is there some variety in the edge? Why?
Final Thoughts
Trees are just one example. You can do this exercise with any number of elements within your chosen scene: mountains, rivers, rocks, cliffs, skies. The possibilities for learning are endless and exciting!
As you can see, this exercise can make your head spin, but with practice this becomes easier and easier. You will become accustomed to thinking this way, and even finding yourself looking at nature differently all the time. Try it while taking walks, or looking out of windows at home or elsewhere. One note of caution though, try not to do it when you are driving! I had an artist friend in California some years ago who used to do this all the time when we were driving to painting locations. I would routinely have to grab the steering wheel to keep us from going off the road! Stay safe!
Upcoming travel and art events with Streamline Publishing:
- June 8-15, 2019: Publisher’s Invitational: Paint Adirondacks
- September 22-29, 2019: Fall Color Week: Ghost Ranch
- October 11-19, 2019: Fine Art Connoisseur Art Trip to France
- November 10-13, 2019: Figurative Art Convention & Expo
- May 2-6, 2020: The 9th Annual Plein Air Convention & Expo
Like this? Click here to subscribe to PleinAir Today,
from the publishers of PleinAir Magazine.


Thank you so much for this valuable information. I’ll work on these exercises right away.
Thank you Wendi!
Any information about how to handle edges is always appreciated. Softening an edge is tricky business, even when I know a hard line is distracting from the overall design. Thank you!
Thanks Sue!
This is a timely article for me, as I am in the middle of figuring out the leaf mass pattern in a busy lilac bush, hit by side light. So confusing but your explanations make a step by step approach to figuring it out, thank you!
Thank you for the comment Judy!
I am planning my first plein air and am very excited about it! I had problems with hard edge painting from photographs..I will study this again and again..great lesson!
Thank you Laura,
With such a good work ethic I am sure you will make lots of progress painting outdoors!